Please note: the forum is closed.
No new user registrations are accepted. For more info, please click here.
No new user registrations are accepted. For more info, please click here.
Octoprint setup and install (as generic as possible)
 Devilclarke
Posts: 13🌟 Super Member 🌟
Devilclarke
Posts: 13🌟 Super Member 🌟
Prelude:
OK, I am installing this onto a Z-603s however the majority of this will be the same for any printer/setup.I will be doing all the setup on my PC running windows 10, unfortunately i cannot offer any help for mac or linux.
Any questions or comments please don't hesitate to contact me, if its an important question i will update the guide in the interest of keeping all the information in one place if not ill probably PM you.
Required:
Parts;- Raspberry Pi 3, doesn't need to be a V3 but with the built in WiFi it makes it much more convenient.
- Pi power supply, I will be using this for testing and once installed on my printer it will be tapped of the main PSU
- Class 10 Micro SD card (6GB+), must be class 10 for a Pi but most make and models will work fine.
- Top & Bottom of pi case, can be any color you choose and any variant as long as its 1 of each. LINK
- Magnets (6 x 3mm), Only if your using the MagMount version which I am! LINK
- Brass Inserts (M3 x 4.1mm), This is where i get mine. LINK
- Pi Heat-sink kit, this will be dependent on the version of Pi your using. LINK
- Pi Fan, Optional but i used on. LINK
- M3 x 12mm Pan Head Screws, to attach top to the bottom. LINK
- No.6 x 1/4 self tappers, attach the Pi to the bottom. LINK
- DuPont Crimps, optional nice to keep a set. LINK
Tools and Software;
- Etcher, freeware LINK
- NotePad++, freeware LINK
- Micro SD Card reader
- Needle nose pliers
- Putty, freeware LINK
SD Card Preparation:
Image Micro SD Card: 1. Download the latest version of of OctoPi
2. Unzip the file downloaded.
3. Open Etcher.
4. Select the image you extracted for OctoPi in Etcher.
5. Insert your Micro SD card into your PC.
6. Select the Micro SD card in Etcher.
7. Click Flash.

2. Unzip the file downloaded.
3. Open Etcher.
4. Select the image you extracted for OctoPi in Etcher.
5. Insert your Micro SD card into your PC.
6. Select the Micro SD card in Etcher.
7. Click Flash.
WiFi Setup:
1. Access the Micro SD Card on you PC.
2. Open "octopi-wpa-supplicant.txt" with NotePad++.
3. Configure your WiFi settings as required, SSID is you network name ![]()
4. REMEMBER to un-comment the edited lines (Remove the # marks)
Note that for me my network uses WPA/WPA2 so i enter my details as below, yours may differ.

Assemble The Case!
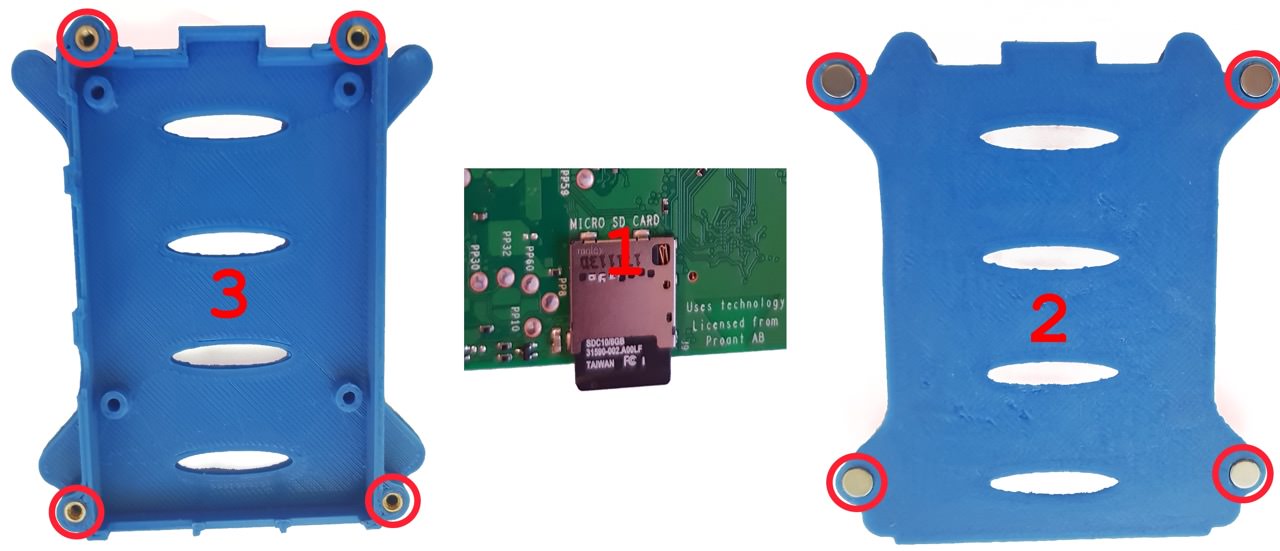
Base: 1. Insert the prepared Micro SD Card into the Pi
2. If using the Mag Mount variant now is when you need to install them, they should be press fit if not some epoxy will set them lovely.
3. Install the threaded inserts into the holes marked, use either brawn or brain. I mean either force them in using a drill press (no spin) or a soldering iron to melt them in (my preferred method).
4. Install your heat-sinks, I am using a Pi 3 but have used a Pi 2 set of heat-sinks and applied the 3rd one to the power regulator. This may not be required but it will be running 24/7 so can't hurt.
** If installing a heat-sink onto the power converter make sure not to short anything out!!!!
5. Install the Pi into the prepared base using 4 off No.6 x 1/4 self tapping screws.

That's it for the base")
2. If using the Mag Mount variant now is when you need to install them, they should be press fit if not some epoxy will set them lovely.
3. Install the threaded inserts into the holes marked, use either brawn or brain. I mean either force them in using a drill press (no spin) or a soldering iron to melt them in (my preferred method).
4. Install your heat-sinks, I am using a Pi 3 but have used a Pi 2 set of heat-sinks and applied the 3rd one to the power regulator. This may not be required but it will be running 24/7 so can't hurt.
** If installing a heat-sink onto the power converter make sure not to short anything out!!!!
5. Install the Pi into the prepared base using 4 off No.6 x 1/4 self tapping screws.
That's it for the base
Top:
So the assembly will differ slightly if you choose not to have a fan, thats fine just skip step 1-2.
1. If your fan did not come with standard DuPont style connectors you need to crimp and fit a set to it. You don't need the tool just use a pair of small needle nose pliers.
2. Install the fan to the top of the case using the supplier screws and nuts, that fan is mounted externally to provide space for the heat-sinks but can be mounted inside if they are not used.
3. Now take the assembled top, or the top as printed and fit it over the pre-assembled base.
4. Using 4 off M3 x 12mm Pan Head Screws, attach the top to the base.
REMEMBER these only need to be finger tight we don't want to damage the print.

4. Using 4 off M3 x 12mm Pan Head Screws, attach the top to the base.
REMEMBER these only need to be finger tight we don't want to damage the print.
Right thats it for the generic hardware, now onto the last little bit of software.
Final Software setup, YAY!
1. Boot the Pi
2. log into your Pi via SSH (it is located at octopi.local or the IP address assigned by your router)
Username is “pi”
Password is “raspberry”
3. Change the password using the passwd command.
NOTE you do not need to expand the file system, current versions of OctoPi do this automatically.
Thanked by 1Samuel Pinches
Comments
thx
Howdy, Stranger!
RegisterIt looks like you've been lurking for a while.
If you register, we will remember what you have read and notify you about new comments. You will also be able to participate in discussions.
So if you'd like to get involved, register for an account, it'll only take you a minute!