Homeโ€บ JGAurora A5 & A3Sโ€บ Modifications & Upgrades

GOODBYE MRS. BOWDEN

philwald1184philwald1184 Posts: 28๐ŸŒŸ Super Member ๐ŸŒŸ
edited March 2018 in Modifications & Upgrades
Basically the only part I needed was a 8x1 steel nipple about 7/8" long. Plus extent the extruder wires...
ย I'm getting better and smoother prints now and no more changing bowden fitting.ย 
ย  But I'm stilling having that one issue of not extruding at start points. I've done alot of research and stumbled upon the lin-advance setting in marlin. An article I read claimed the k factor in lin-advance should be higher for bowden setups and lowered for direct drives. The costume firmware has the k value at 75. I've been everywhere from 2-130 and dont see much of a differece.ย 
ย  Samuel Pinches? Would you be able to recommend anyone that could weigh in on this issue. I really like this setup but just can't figure out why its not extruding correctly at start points over 3" apart.ย 
ย Thanks in advance!

Thanked by 2Samuel Pinches Andre
Post edited by philwald1184 on

Comments

  • Samuel PinchesSamuel Pinches Posts: 2,997Administrator
    Wow! Amazing modificationย @philwald1184
    ย ! I'm heading to bed, I'll reply tomorrow!
  • mannymanny Posts: 4Member
    Nice mod but how much build height do you lose on the Z axis?
  • philwald1184philwald1184 Posts: 28๐ŸŒŸ Super Member ๐ŸŒŸ
    You really don't have to sacrifice any build hight if your willing to widen the opening on top. I will eventually but I want to get it working correctly first .This extrusion problem is making me start to regret it. Although I can't imagine why it started doing what its doing right after I modified it .
  • Samuel PinchesSamuel Pinches Posts: 2,997Administrator
    Is there still some PTFE tube between the extruder and head?
  • philwald1184philwald1184 Posts: 28๐ŸŒŸ Super Member ๐ŸŒŸ
    Yes actually all the way from extruder to head. PTFE tube goes all the way through my fitting
  • Samuel PinchesSamuel Pinches Posts: 2,997Administrator
    My only thought was perhaps if the filament was loose somewhere there would be some deflection or bending, which would cause a delay in extrusion, which could explain your extrusion lag.
  • philwald1184philwald1184 Posts: 28๐ŸŒŸ Super Member ๐ŸŒŸ
    No the way I put it together there is a piece of bowden tube going from extruder to top of j-head. Way more soild then bowden system was so I dont think its that
  • Samuel PinchesSamuel Pinches Posts: 2,997Administrator
    if you extrude manually, do you see a delay between the command, and filament starting to come out?
  • philwald1184philwald1184 Posts: 28๐ŸŒŸ Super Member ๐ŸŒŸ
    No. It Seems to start instantly
  • philwald1184philwald1184 Posts: 28๐ŸŒŸ Super Member ๐ŸŒŸ
    Also when I watch while its printing at the point I know it'll fail, the extruder starts instantly
  • Samuel PinchesSamuel Pinches Posts: 2,997Administrator
    edited March 2018
    Is there some kind of simple test you can do to narrow down the cause? The connection to moves over 3 inches sounds like its a mechanical issue, but I'm a bit stumped as to what else might be causing it. Could it be something to do with the tension on the filament spool?
    Perhaps you could try a test print - like two simple cylinders, far enough apart to cause the issue?
    Post edited by Samuel Pinches on
  • philwald1184philwald1184 Posts: 28๐ŸŒŸ Super Member ๐ŸŒŸ
    That's what I've been doing for the past 2 days. Have it hooked to my laptop and been printing the same 2 objects over and over. Stopping it every time to make a dif adjustment every time it fails. I guess that's why its so frusterating already. It's not tension on the spool cause I've tried helping it along at those point.ย 
    ย Ill check the voltage on extruder driver again and if its not that ill take extruder off and check everything again. I guess I assumed it might have somthing to do with the firmware being it was setup for a bowden system .
  • Samuel PinchesSamuel Pinches Posts: 2,997Administrator
    No I'm sorry @philwald1184, I can't think of anything that would affect it in the firmware like this.
  • philwald1184philwald1184 Posts: 28๐ŸŒŸ Super Member ๐ŸŒŸ
    Ok. Thanks! Ill keep digging...
  • philwald1184philwald1184 Posts: 28๐ŸŒŸ Super Member ๐ŸŒŸ
    Just want to add on here that I got it working and its running like a champ now. Not sure if its was just one problem or a host of issues but I tuned the extruder driver( which was too low) higher temp at 210 (previous at 190 with bowden) and a 0.60 to 0.80 extra restart distance and now she's laying it down beautifully. Thanks for all the help!
  • Samuel PinchesSamuel Pinches Posts: 2,997Administrator
    edited March 2018
    Awesome - you did a great job with that mod! Glad to hear itโ€™s working for you. If you have time, it would be great to hear more details about how you did it.
    Post edited by Samuel Pinches on
  • philwald1184philwald1184 Posts: 28๐ŸŒŸ Super Member ๐ŸŒŸ
    Well basically I took a piece of 3/8 rod a few inches long, cut 8x1 thread on it at least and inch and drilled a 4mm hole though it. I then cut off a 7/8" piece and polished the end and that's it. It looks somthing like this but with thread the whole lenght of it.ย 


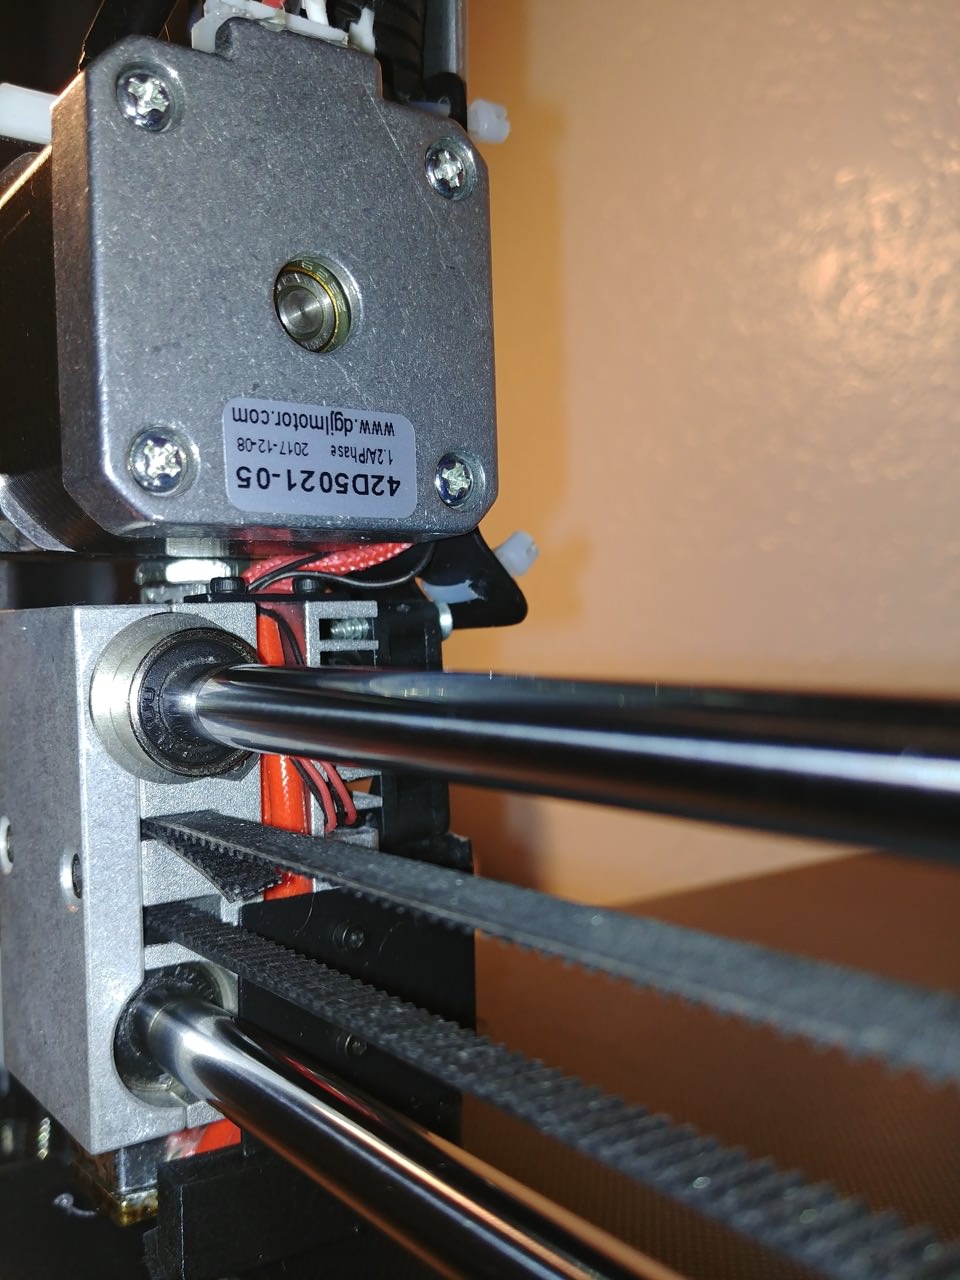
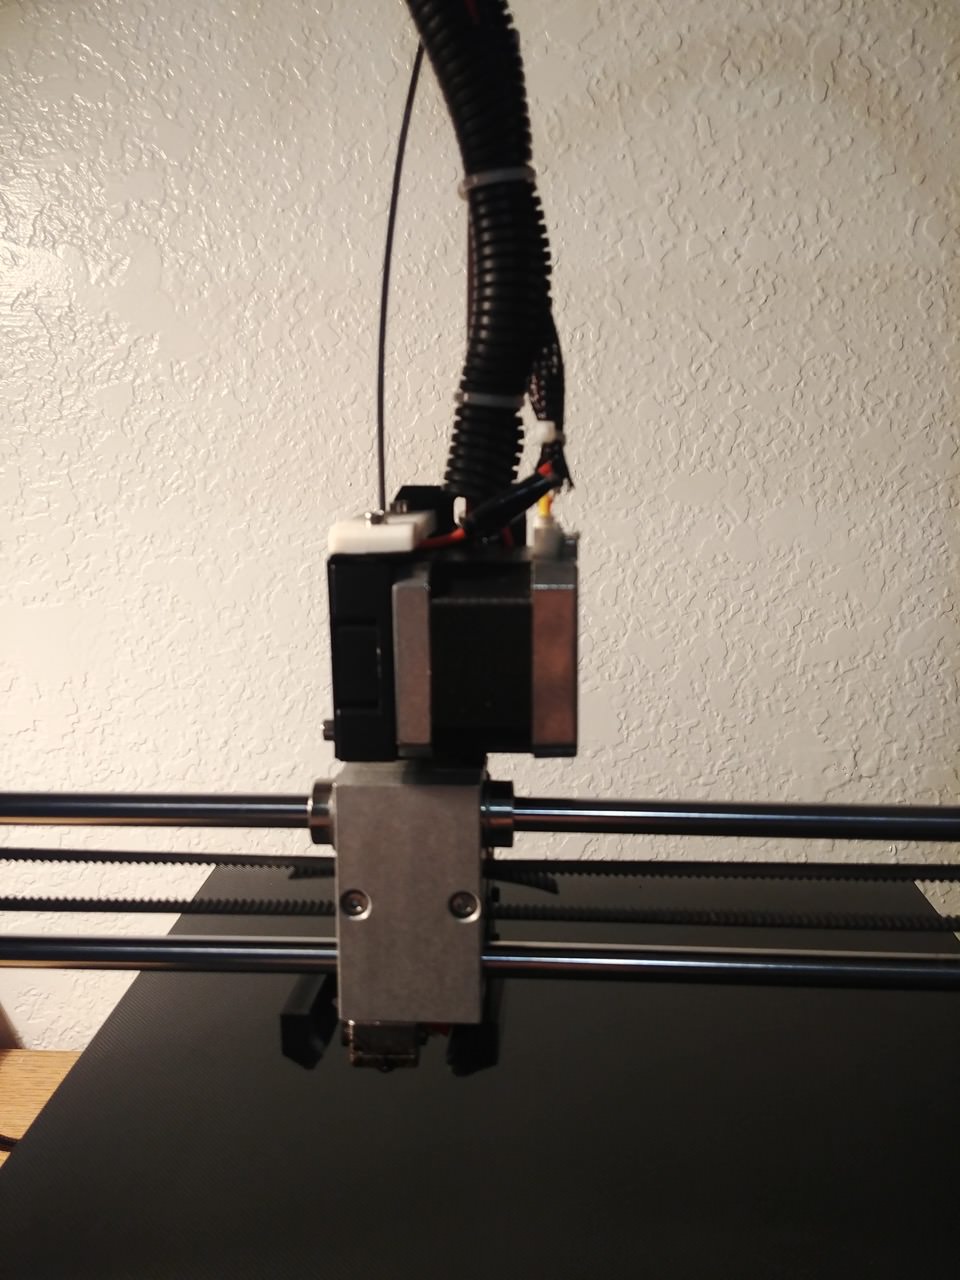
    The nuts you see in between here are just a couple thin nuts I put in there in case I needed to tighten it up in a certain position but as it happens they weren't really needed.
    ย  If you drill a 4mm or 5/32 hole into it you can insert a piece of PTFE tube through it and have it extent further down towards the hot end (about 1 1/2" ) and also upwards (about 1/4") and I then glued it into my fitting so it wouldn't get dragged up or down.
    I did however want a small gap to have the wires run underneath stepper motor but if you have a 7/8" long fitting then it'll tighten itself before closing that gap. You can see the wires here...
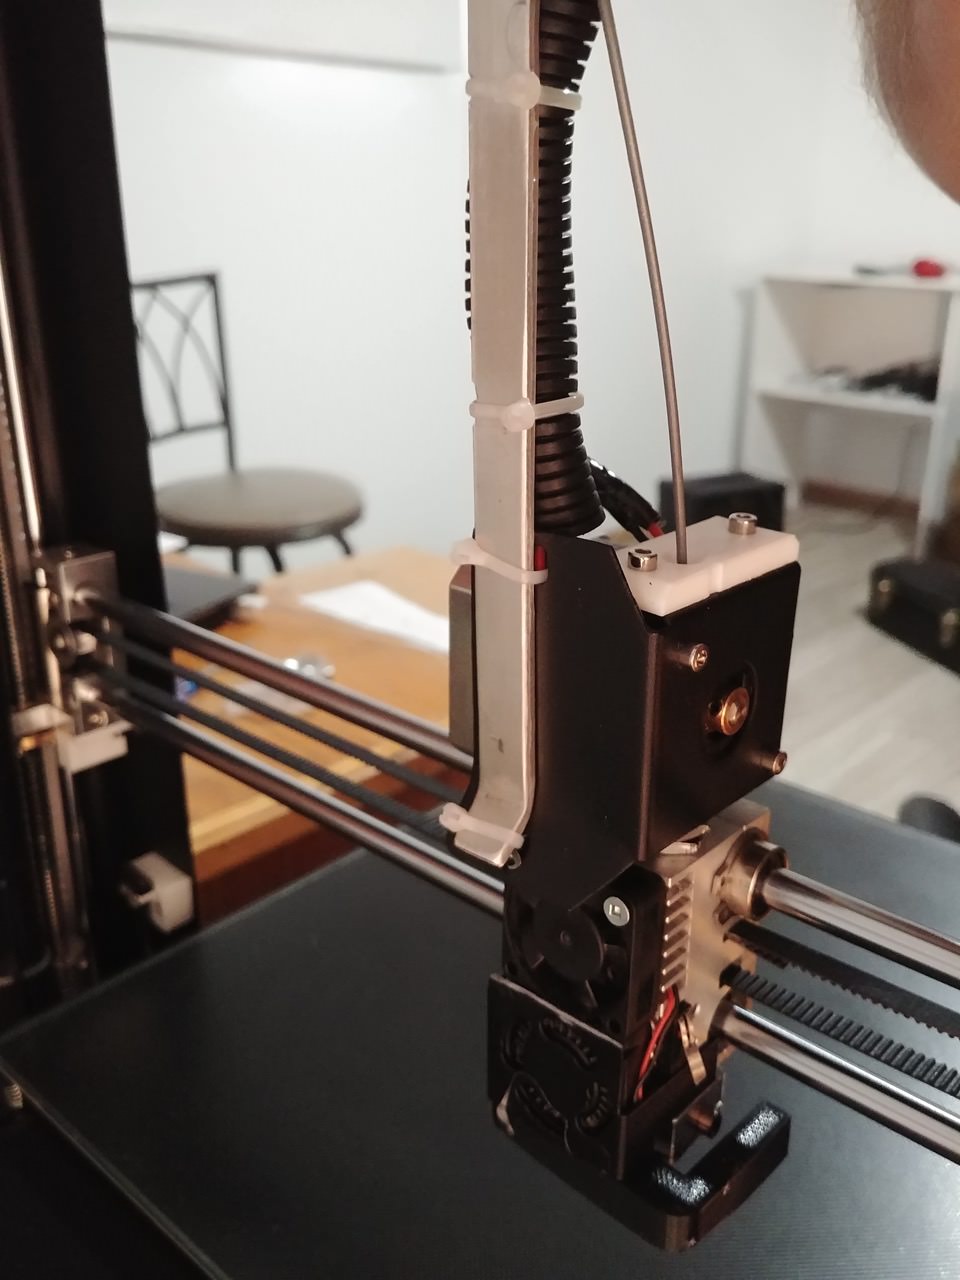
    I used the original extruder mount and everything but I had to make a slight bend to the bottom of it (actually its the original top of it) to clear the extruder fan.ย 
    I then just drilled another couple holes beside the original mounting holes on extruder bracket and made a thin piece of flat aluminum to fasten the wires to to keep them solid as they were bending to much right on top there. But anything could be used instead, I had a pencil fastened there at the start and it worked well.
    I did cut off the extruder fan guard as you can see but didnt have too. That as before I bent extruder fan bracket which works better. I did obviously have to take extruder apart to screw it on there.
    ย 
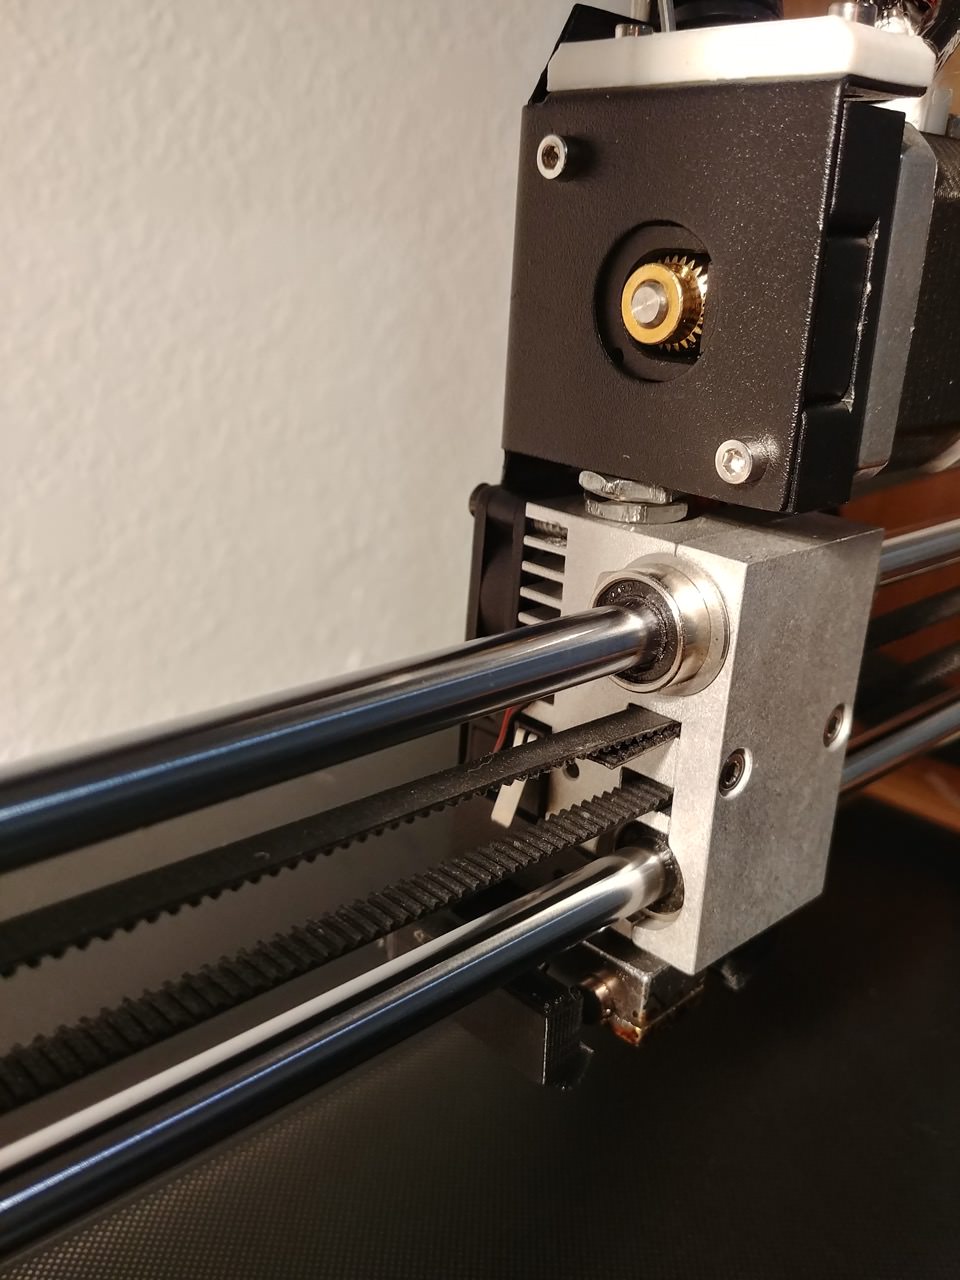
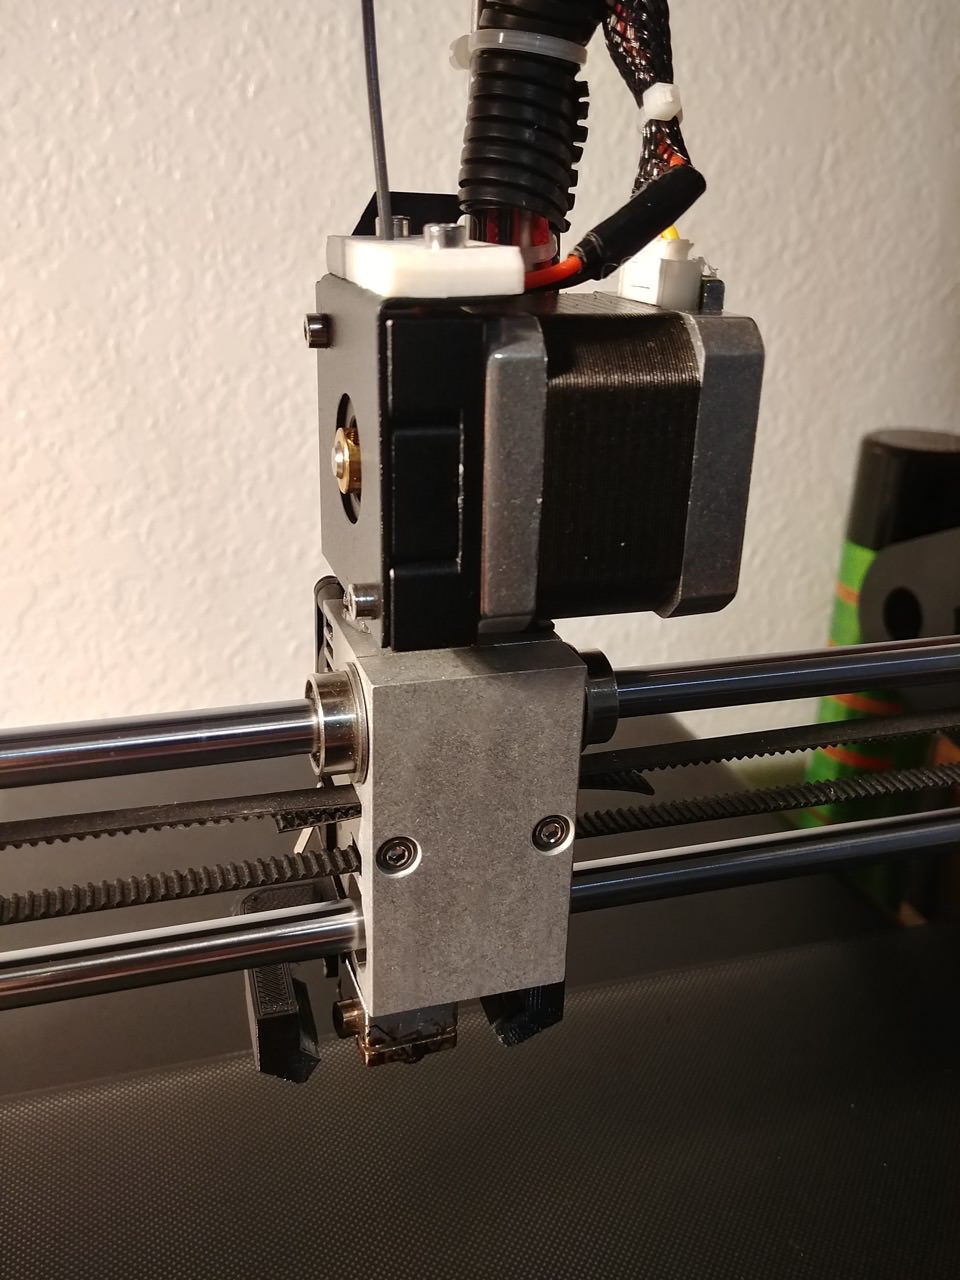
And thats pretty much it. I spliced the wires where they connect to the side of the A5 and put them all into that protective casing.ย 
    ย Been printing 0.2 layer prints at 80mm speed and they turn out real greatย 
    ย LOVING IT!!
    Thanked by 1Samuel Pinches
  • HevilpHevilp Posts: 136๐ŸŒŸ Super Member ๐ŸŒŸ
    The original motor has not to much weight?
  • KmanOzKmanOz Posts: 2Member
    The one thing I like about the Aurora is the printhead and the low mass design. Attaching a stepper directly to it and throwing that mass around cannot be good for ghosting surely. Makers muse has developed a print that tests ghosting. I'd like to see the results of both setups but I already know the answer I recon.
  • Samuel PinchesSamuel Pinches Posts: 2,997Administrator
    edited July 2018
    Considering the large mass of the y axis, I wouldnโ€™t expect a direct drive x axis to be any worse than that? However, you might want to turn down the x axis acceleration a little in the firmware now.
    Post edited by Samuel Pinches on
  • MattMatt Posts: 314๐ŸŒŸ Super Member ๐ŸŒŸ
    edited November 2018
    A 17 july thread... Ok, hope someone will stand: could a nema 14 work good anyway?
    Post edited by Matt on
  • Samuel PinchesSamuel Pinches Posts: 2,997Administrator
    @Matt - I know for a fact that the nema 17 pancake stepper works well on my machine with a direct drive, but I think a nema 14 would be too weak unless geared for higher torque. When geared, it would probably work fine, but then the top extrusion speed might be limited a little.
  • AndreAndre Posts: 16๐ŸŒŸ Super Member ๐ŸŒŸ
    Maybe an bondtech BMG (or clone from Aliexpress, search for "dual drive BMG") with pencake stepper may help reducing weight. You also get three times the resolution than using ungeared extruder. And of course the grip between bondtech gears and filament ist twice as good as any other extruder, so only advantages (exept the costs: 29โ‚ฌ for " Dual Drive BMG" and about 7โ‚ฌ for pencake stepper motor).
    Thanked by 1Samuel Pinches
  • Samuel PinchesSamuel Pinches Posts: 2,997Administrator
    Haha, I was actually looking at the BMG clone extruder this afternoon for my diy 3d printer, along with some other stuff from the triangle labs aliexpress store! Ended up leaving it for the moment, but did get a few other bits and pieces from them.
  • MattMatt Posts: 314๐ŸŒŸ Super Member ๐ŸŒŸ
    edited November 2018
    Ok: so we must stick to a slimmer ("pancake") nema17? I've thought to the 14 'cause of reducing both weight and dimensions (due the builders was too tight in placing the x-motion stepper so near to the glass border... Yet another "built for millimeters" nag from JG crew...), but if it isn't feasible, well... Let's use a half centimeter's wider stepper...
    Post edited by Matt on
  • MattMatt Posts: 314๐ŸŒŸ Super Member ๐ŸŒŸ
    edited December 2018
    Is any filament detection good to substitute the current one? For it is extremely difficult sometimes to insert the filament in it. Second: could any common m6 throat be used as a connector between the sliding part and the stepper block?
    Post edited by Matt on
  • ProkktorProkktor Posts: 146๐ŸŒŸ Super Member ๐ŸŒŸ
    I ordered some M6->M6 throats for under 2$ in china, availlable with and without ptfe...

    But I go a different way and will soon install this monster in my JGAurora:


    I have written an article on how to build it but did not yet post that, the whole thing is und 60$ + a lot of printing^^
  • HelpstoneHelpstone Posts: 4Member

Sign In or Register to comment.